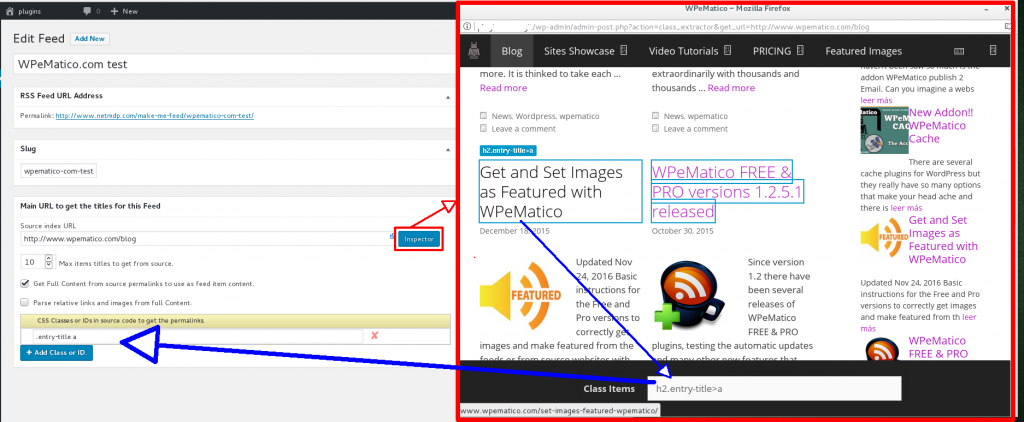
The first thing you need to do is find the titles from the DOM that contain a link to each post. With the new “Inspector”, you can find these elements more quickly and easily. All you have to do is follow these steps:
1. In the field “Source index URL”, enter the route of the site that you wish to inspect. Then, click on the Inspector button, which will open a new window of that site where you can inspect the elements that it is composed of.
2. In the new inspector window, search for the titles that are linked to the posts you want to publish. To do this, you must move the mouse cursor over the elements, which will be marked with a blue outline. As mentioned above, the title must be linked to the post, meaning that you should search for the <a> tag of the title. In the example image, you can see that the title “Get and Set Images as Featured with WPeMatico” is structured in the following way: h2.entry-title>a. In simpler terms, the title is composed of an h2 element with a class called “entry-title”, and within this element is the link <a> that we are looking for. It is worth noting that, since all the titles of the posts from the site you chose will have the same form, it is not necessary to search for all the titles; one title is sufficient.
3. Once the element is found, you can click on it to close the inspector and send its structure to the field “CSS Classes or IDs in source code to get the permalinks” in Make me Feed.


