Installing the Free Version of WPeMatico
It’s just like any plugin in WordPress. You can follow the steps on the plugin Installation page.
After installing and learning how to use it, you can run some tests.
WPeMatico core has a lot of free features that you should give a try before you buy an add-on. If you love it, then proceed with…
Installing an add-on
After the purchase of an add-on, you should receive an email with all your license keys and direct links to your purchased downloads.
These links expire in 24 hours. After that (or if you don’t receive the email), you must go to your account to find and manage all your information, license keys, downloads and subscriptions.
Proceed with the installations
- Download all your files to your computer and upload them to your WordPress Plugins from the Add New Plugin item in your dashboard.
- If you can’t upload the plugins from your WordPress admin, you must upload the unzipped folders of the files to your server through FTP to the plugins directory of your site ( /wp-content/plugins)
- Take care that you don’t upload the zip files. You must decompress them in your computer and then upload the entire folder of the add-on.
e.g.:
/wp-content/plugins/wpematico_professional/
/wp-content/plugins/wpematico_fullcontent/
/wp-content/plugins/wpematico_thumbnail_scratcher/ - If the folders already exist, you should delete them before uploading the new files.
- Go to the Plugins page in your admin and activate the plugins.
- You’ll find the WPematico Addons page under
- WPeMatico –> Extensions page
- WordPres Admin –> Plugins –> WPeMatico Addons
- If you want the add-ons also in the WordPress Plugins page you can activate the option in WordPress Admin –> Settings –> Writing screen. Below you’ll find a WPeMatico Sections with few options.
- You’ll find the WPematico Addons page under
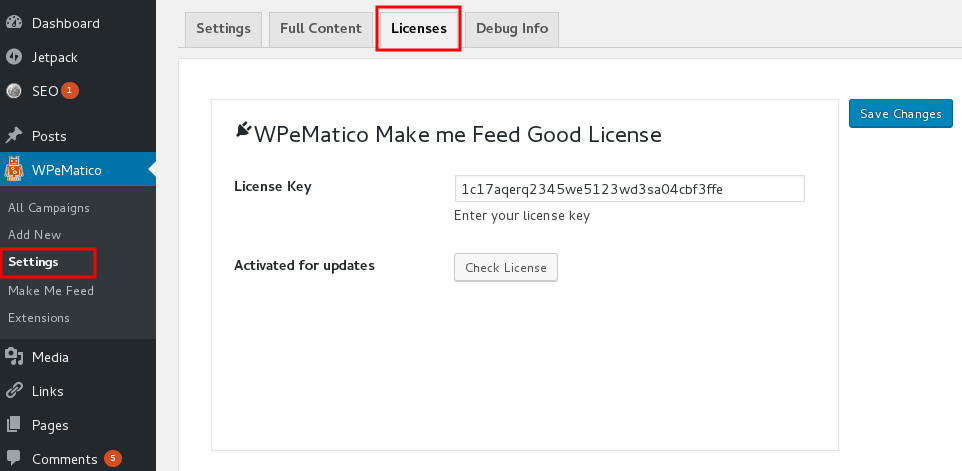
- Go to your Licenses page and fill in all the license keys received in the purchase email.
 The Check License button appears when a key is entered in the License Key input field.
If you aren’t sure what license to use, take a look at this FAQ.
Proceed with the updates
From time to time, a new version of every add-on is released. When this happens, you should be notified in your WordPress admin.
At this time, you must go to the updates page or to the item in Plugins->WPeMatico Add-ons.
- If you entered the license keys, activated them and are still active (not expired), you can update like any other WordPress plugin by clicking Update Now.

- The second option is do it by FTP to the plugins directory of your site ( /wp-content/plugins)
If the add-on’s folder already exists, you must delete it before uploading the new files.
** - There is a third option that consists in being installed and activated the plugin Easy Theme and Plugin Upgrades:
- Download the latest zip file for your plugin.
- Log into your WordPress site.
- Go to Plugins > Add New.
- Click the “Upload Plugin” button at the top of the page.
- Select the zip file with the new plugin version to install.
- Click the “Install Now” button.
When the add-on is updated, the pink banner should disappear.
Enjoy your autoblog!


